

How do I set up my Zigbee network?
In this article you will learn step by step how to set up a Zigbee network and how to connect and configure your devices in this network and how to deal with possible errors.
Please read the article first: "What is Zigbee and how to use it" to find out more about the structure and elements of a Zigbee network.
Contents
This guide did not solve your problem?
We will be happy to help you set up your network correctly. There are several ways to do this.
-
Send a written request to our team: Technical support.
-
Make an appointment to clarify your problem over the phone.
In urgent cases, you are welcome to call our hotline. We are available for you Monday-Friday, 9:00 am to 5:00 pm.
How is a Zigbee network set up?
A Zigbee network is essential for the operation of Zigbee devices and must be set up once. This is comparable to a WLAN network into which your computers and smartphones/tablets are integrated.
You can find out what a Zigbee network is and which components are required in this article.
However, please note that each device can only be connected to one Zigbee network at a time. This is different from your computer or smartphone.
The following steps are required to set up a Zigbee network:
-
Setting up the Zigbee control center
Set up a Zigbee central unit (also known as a Zigbee hub or Zigbee coordinator). Examples are Philips Hue Bridge, Amazon Echo Plus, but also iluminize controllers and actuators. These also act as a (functionally very limited) Zigbee hub if you do not have another Zigbee hub.
-
Installing devices and lamps
Install your Zigbee devices and lights and switch them on.
-
Reset the controllers and actuators (optional)
If your device was previously connected to another Zigbee network, reset it to the factory settings (iluminize controller/actuators: press the Prog. button 5 times)
-
Activate search mode on the control panel
Start adding devices to the Zigbee central unit (activate search mode)
-
Start connecting the devices
Activate the connection setup on your Zigbee device. Follow the operating instructions for your device. We recommend connecting and configuring the devices one after the other. This will help you keep an overview, especially if you have many rooms, devices and controls.
-
Checking the connection
If the connection is successful, the connected devices or lamps will signal this by flashing. Check the relevant instructions to see if the process was successful.
Note: some Zigbee control centers expect the devices to be configured after the connection. This includes the name and an assigned room. Only then can the new devices be tested.
Which components do I need?
Since a Zigbee network is a mesh- network topology, it must consist of at least two devices. The required and optional devices are listed accordingly:
A Zigbee bridge (also called a control center or hub) can simplify the entire network setup process and help you set up a network
without the extra effort normally associated with setting up a coordination unit.
The most common Zigbee central units for lighting installations are thePhillips Hue, Amazon Echo Dot and the
IKEA Trädfri. Each bridge has its own advantages and disadvantages, which bridge should be used depends on personal preference.
This is the basic Zigbee unit that usually provides the ability to turn the connected light source on and off, dim it and - depending on the variant - mix the colors, all of these options being done digitally without turning off the actual lighting system.
This can be seen as part of the "smart" components of a smart home system.
If you are not using a Zigbee control center, a wall/handheld remote control is required to digitally control all basic and advanced functions of a controller/actuator.
A wall/handheld remote control makes you independent of the app. It supports functions such as dimming, color mixing and saved scenes. Please note, however, that depending on the remote control and Zigbee control center, the configuration in the app may not be supported.
Although it can be connected to the Zigbee network, no device appears in the device list. In this case, connect the remote control directly to the actuator using Touchlink or Find & Bind. This works independently of the Zigbee control center, even if it is switched off.
Can be used in combination with a bridge/hub and software to control the functions of a controller/actuator and implement user-defined light scenes, light zones ,schedules, light alarm clocks, etc.
The most frequently used applications in combination with a Phillips Hue Bridge are: Phillips Hue App, Apple HomeKit.
This is the "visible" part of every light installation.
The LED light strips are available in numerous configurations and must be purchased with the area of use, application and personal preference for color and styling in mind.
The most important factors to consider when deciding on an LED light strip:
-
If the light strip is to be installed in a humid environment, it must have a suitable IP protection class .
-
Is it used as main lighting or as additional lighting - then you need to pay particular attention to the Ra value.
Most installations for direct and accent lighting consist of spotlights, as these can provide the room not only with brightness but also with accent lighting, allowing certain elements in the room to be emphasized.
The most important factors that play a role in the search for a spot:
-
Warm or cool white light? - the Kelvin values.
-
Accent lighting or general lighting?- The beam angle plays a major role here.
-
How much light would you like to receive? - The number of lumens per spot.
-
The area of application? - RA values.
I don't have a bridge: How do I create a Zigbee network?
Every Zigbee network must have a coordinating unit at its center. Either a dedicated
bridge or a participant in the Zigbee network that acts as a coordinating unit.
If you do not have a dedicated Zigbee bridge (such as thePhillips Hue) besitzen, dann wird ein LED-controller/actuator will be declared the control center of the Zigbee network and thus assume the role of a bridge/hub.
How do I teach my controller/actuator?
Each time Zigbee components are to be integrated with each other, they have to go through a pairing process, which normally consists of two steps:
Setting up a Zigbee network
Direct coupling of the Zigbee components
Please note that the actuators/controllers must go through the following preparation steps before you can start setting up your Zigbee network.
Below you will find step-by-step instructions for coupling your actuators/controllers and control elements:
To set up a Zigbee network, you need at least the following components:
-
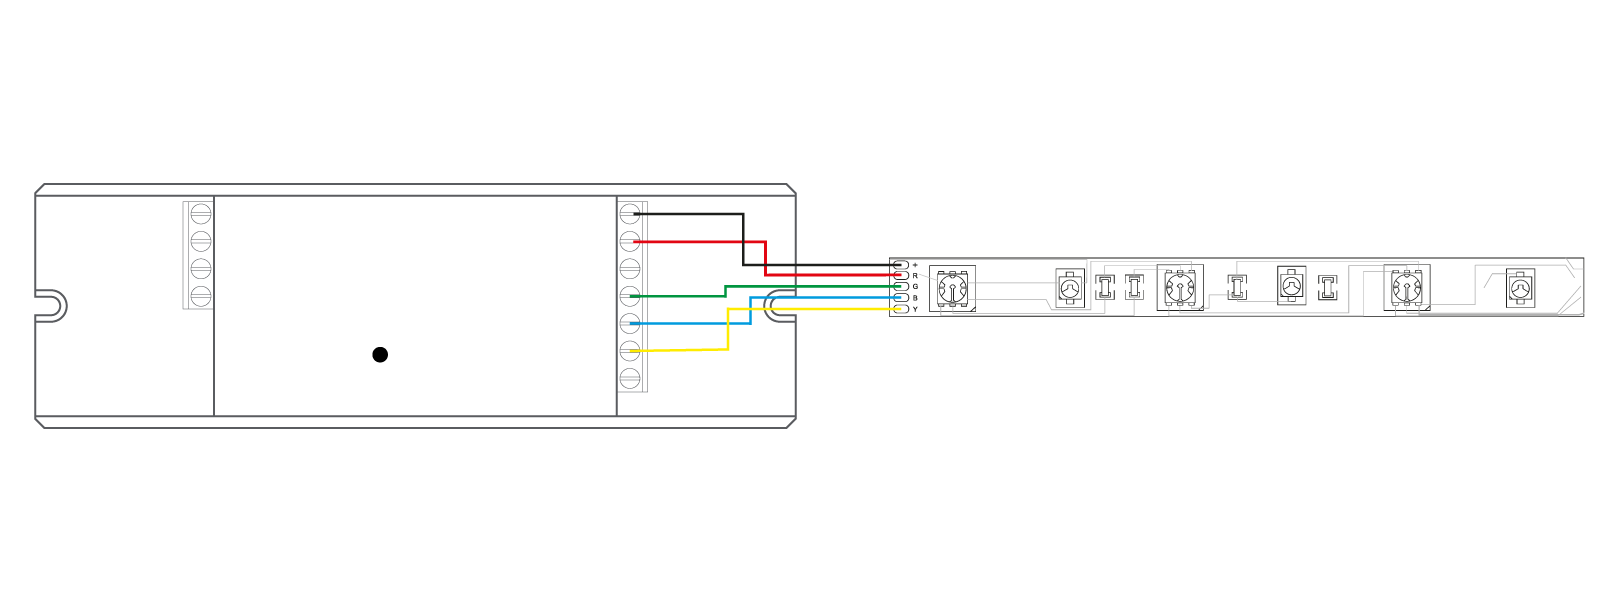
A controller/actuator with connected lamps /LED light strip and a second actuator or LED controller.
-
A controller/actuator with connected lamps and a Zigbee hub or a bridge.
Make sure that all actuators and controllers can be switched on and off separately.
Ensure that a light source or illuminant is connected to each of the actuators and controllers.
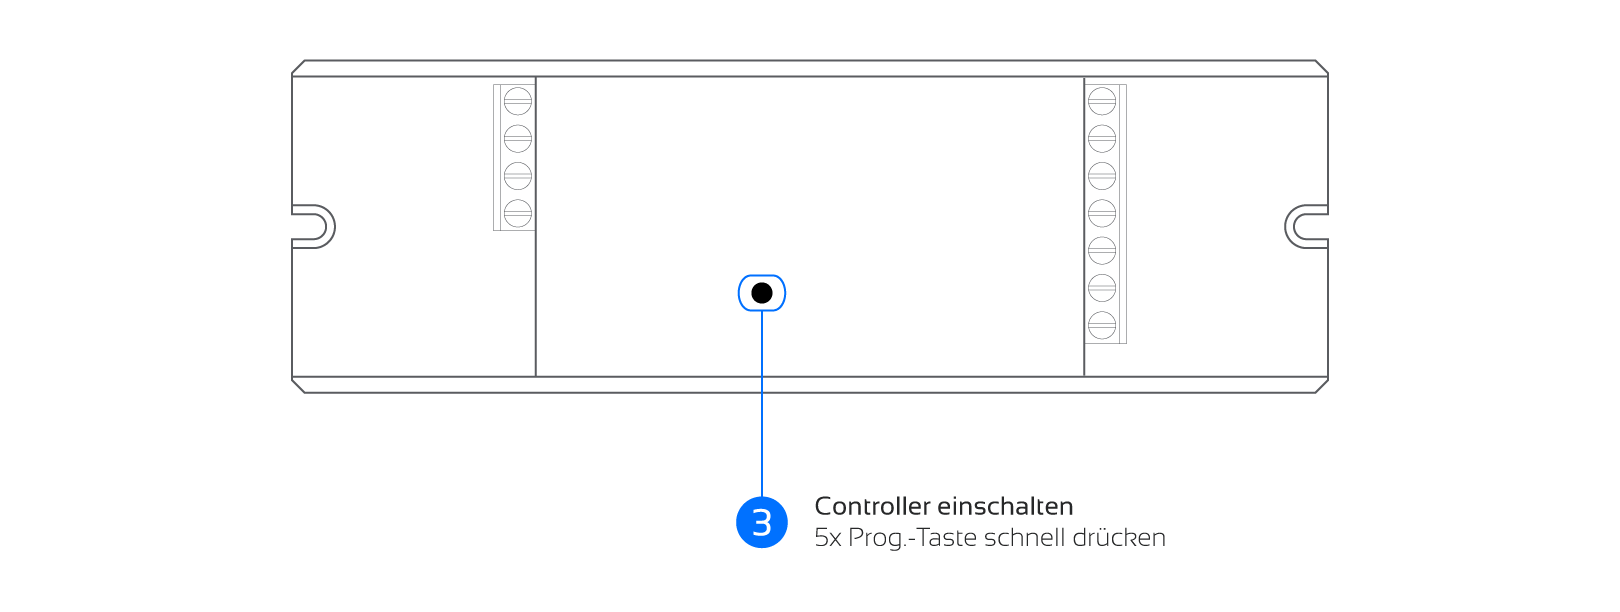
Press the "Prog." button on each actuator/controller 5 times in quick succession.
What happens next?
The light source should confirm the reset by flashing.
If the actuator/controller has already been reset, the light may not flash.
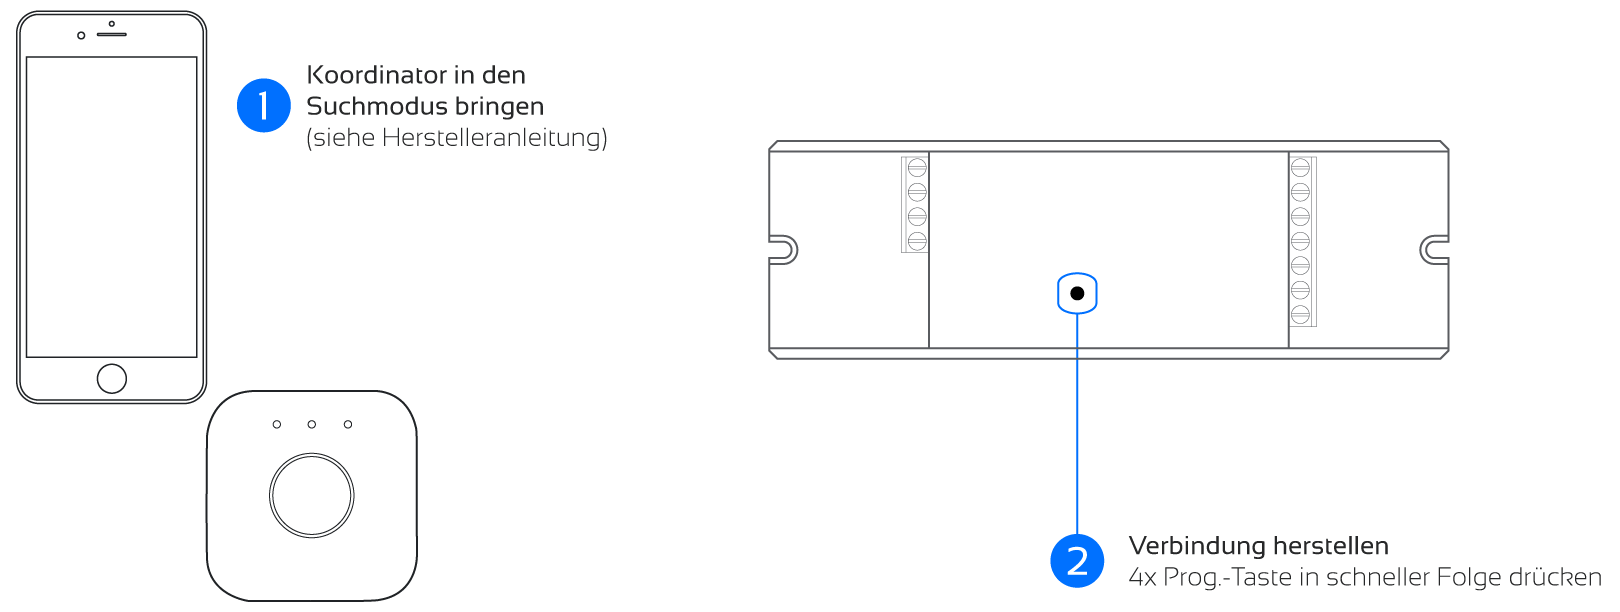
Start the search for a new lamp/light within the Zigbee Bridge (Hue) according to the device instructions.
Press the "Prog." button on the controller/actuator 4 times in quick succession.
What happens next?
The Zigbee (Hue) Bridge will list the controller/actuator as a lamp/luminaire.
-
Follow the instructions of the Zigbee Bridge (Hue) and assign the newly found lamp to a room or zone.
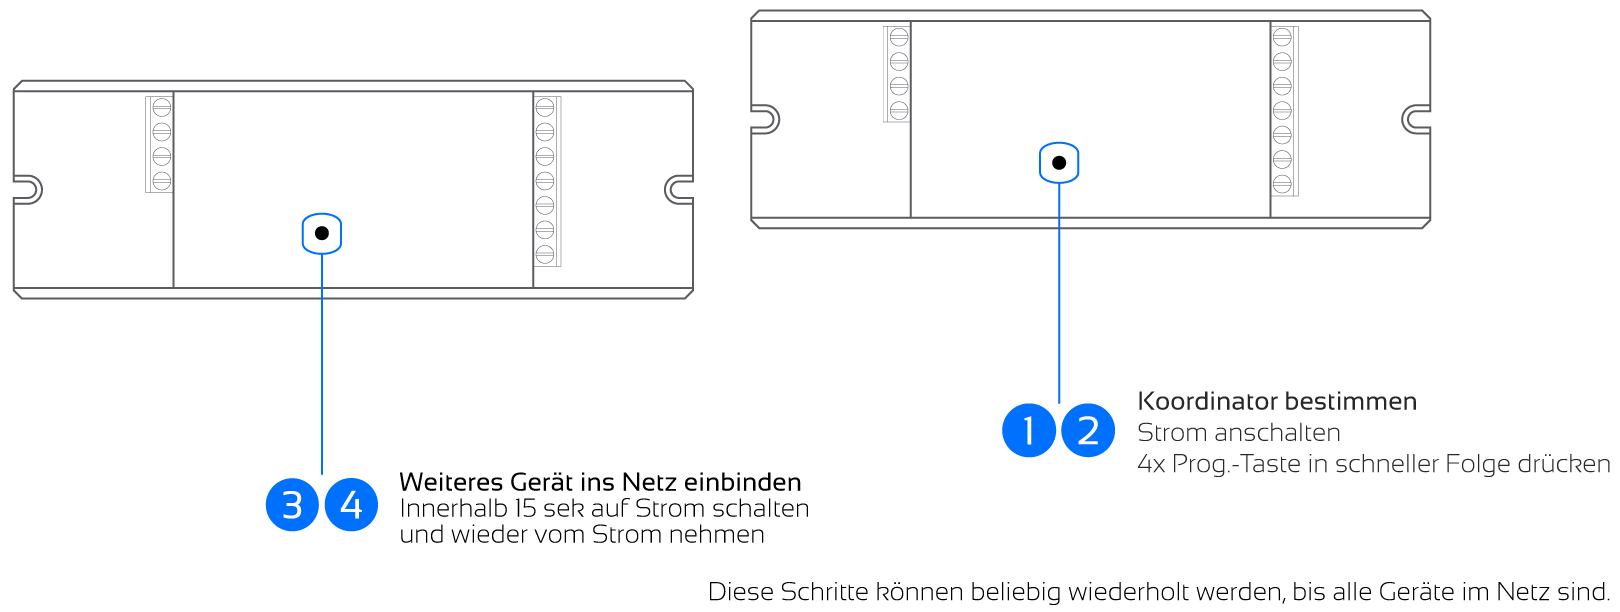
Designate an actuator/controller as the coordinator and switch it on (this coordinator must remain switched on for the entire learning process!)
Press the "Prog" button 4 times in quick succession on the specified coordinator actuator/controller.
Switch the next actuator/controller to power within 15 seconds.
Disconnect the actuator/controller that has just been switched from the power supply again
Press the "Prog" button again 4 times in quick succession on the specified coordinator actuator/controller.
Switch the next actuator/controller to power within 15 seconds.
Disconnect the actuator/controller that has just been switched from the power supply again
Repeat all steps until all actuators/controllers are in the network.
As soon as an actuator/controller is switched on, the connected light source flashes.
How do I connect my control units to the Zigbee network?
The Zigbee central unit (usually the bridge or an actuator/controller) and all components that are to be used must be brought into the same Zigbee network and given a Zigbee address.
The following steps will help you to integrate your control elements such as a remote control or a wall dimmer into the Zigbee network using Lightlink technology, with or without a dedicated bridge.
Please note: setting up a Zigbee network is not the same as pairing devices directly, but is mandatory for pairing.
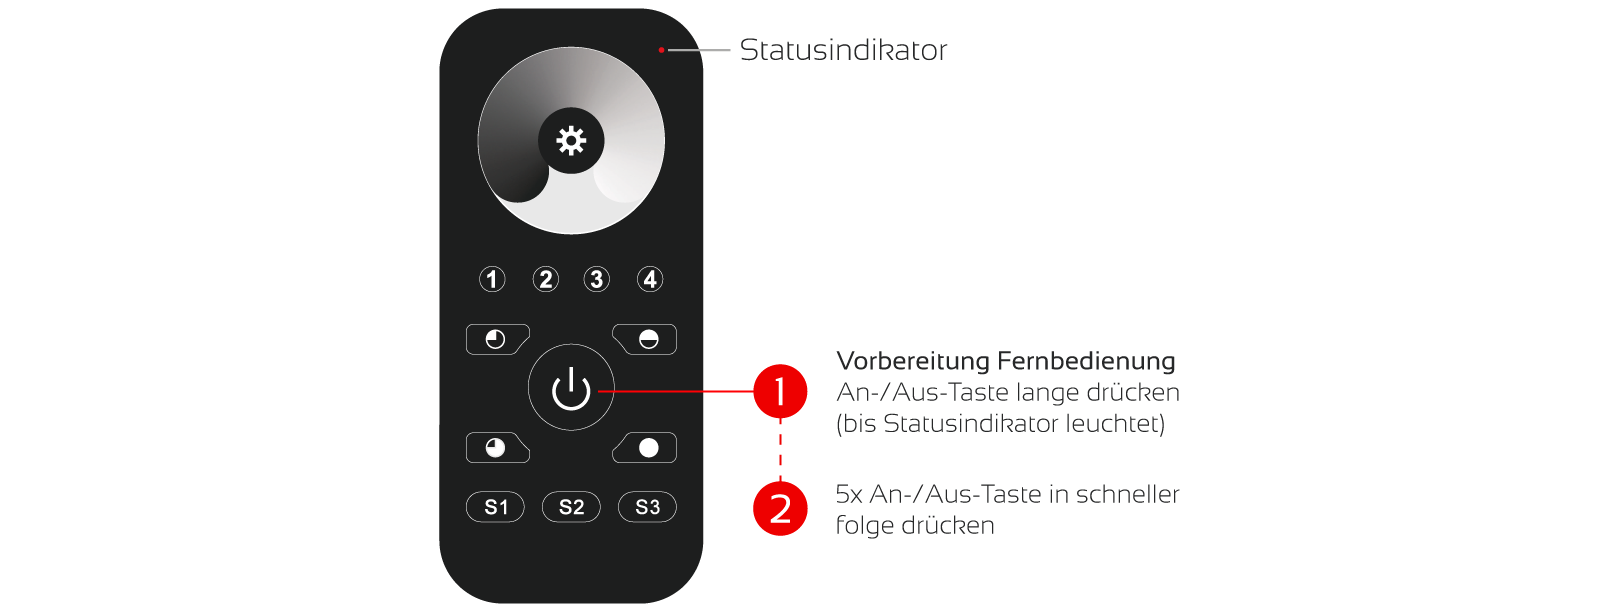
Press and hold the central on/off button until the LED on the control unit lights up.
Immediately afterwards, press the On/Off button 5 times in quick succession.
What happens next?
The light source should confirm the reset by flashing.
If the actuator/controller has already been reset, the light may not flash.
Pairing remote control (5130) with bridge
Coupling wall dimmer colorful (5146) with bridge
Coupling wall dimmer white (5146) with bridge
Start the search for a new lamp/light within the Zigbee Bridge (Hue) according to the device instructions.
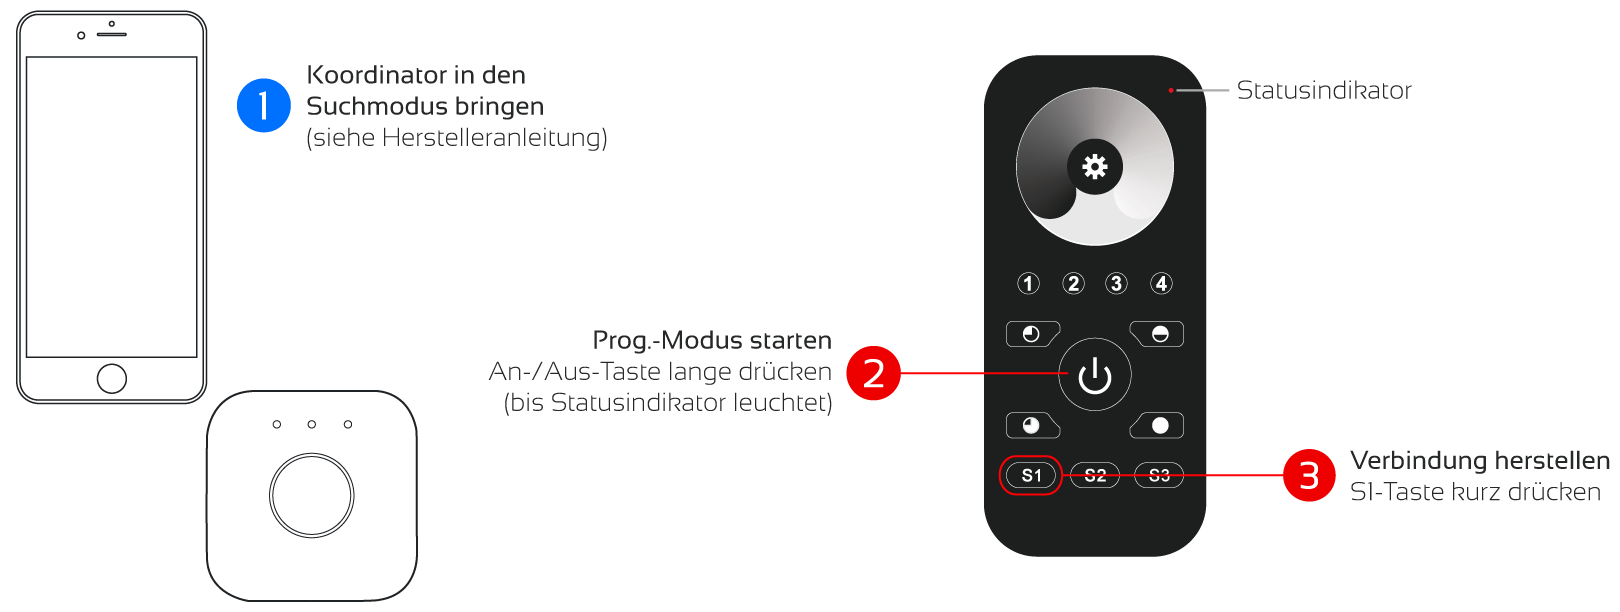
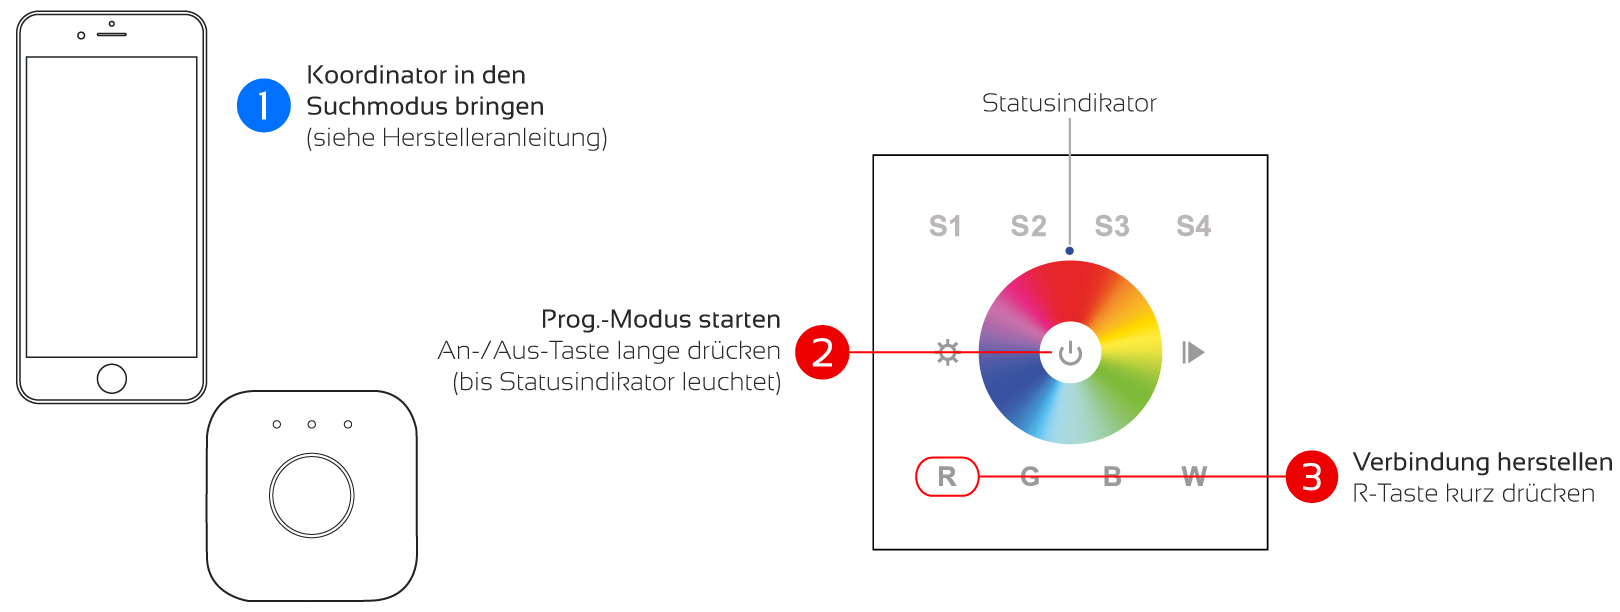
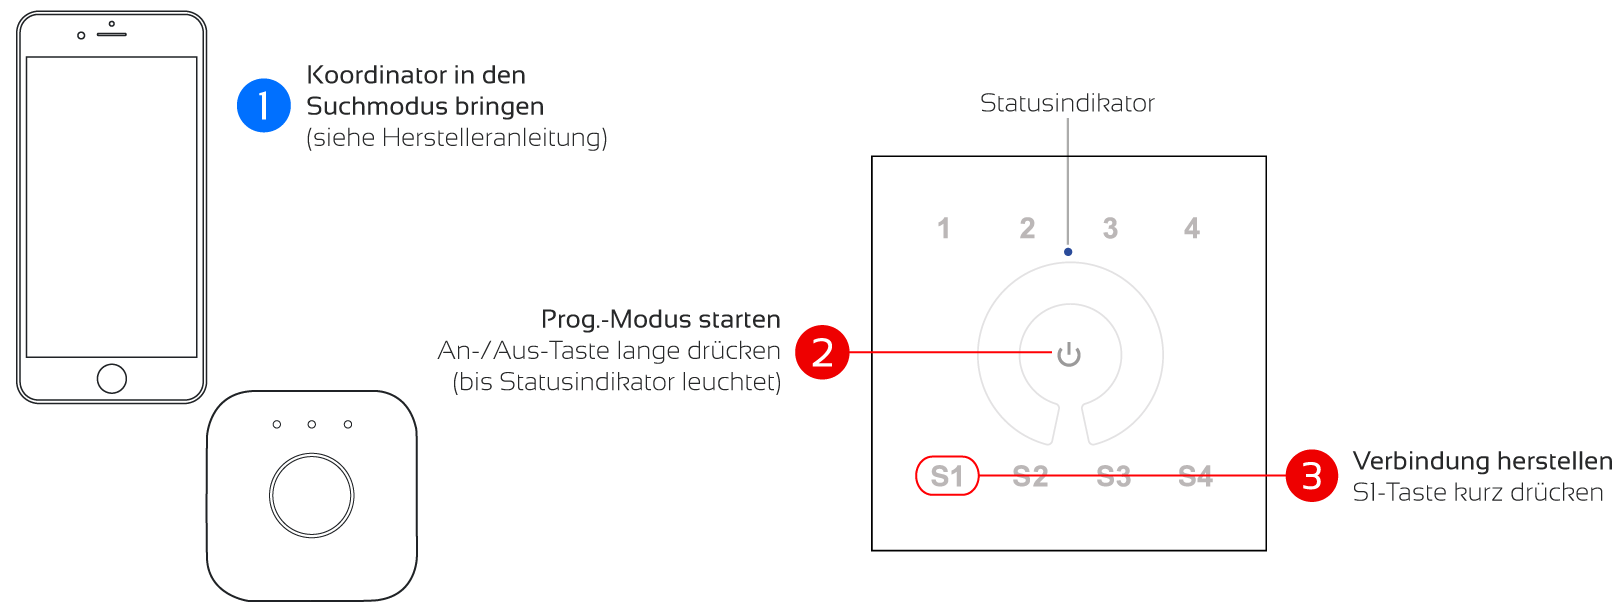
Press and hold the central on/off button until the LED on the control unit lights up.
Press the S1 or R button briefly immediately afterwards.
Wait until the status LED on the control unit flickers quickly.
What happens next?
Search mode is indicated by the LED flashing slowly.
Successful integration is acknowledged with a rapid flickering of the LED.
The Zigbee (Hue) Bridge will not visibly acknowledge a successful integration and may even display "no devices found"
Press the "Prog" button 4 times quickly on the specified coordinator actuator/controller.
Press and hold the central on/off button until the LED on the control unit lights up.
Press the S1 or R button briefly immediately afterwards.
What happens next?
Search mode is indicated by the LED flashing slowly.
Successful integration is acknowledged with a rapid flickering of the LED.
Step 2 must be carried out within 15 seconds of step 1!
How do I connect my control devices to a Zigbee controller/actuator?
Any Zigbee 3.0 device can connect to other Zigbee 3.0 devices via Touchlink as long as the distance between the devices is no more than 10 cm.
Iluminise Zigbee 3.0 devices have the function to connect over a distance of more than 10 cm by using find-and-bind technology.
In the following instructions you will find the necessary steps to establish the connection via Touchlink and Find & Bind.
Attention: for each control unit, you must decide to use either Touchlink or Find & Bind for coupling the actuators/controllers, but not both at the same time.
Make sure that all Zigbee network participants in a Zigbee network are already integrated, either via a coordinator or via a bridge.
If the Zigbee element is not part of the network, it cannot communicate with other Zigbee devices without causing a decoupling from other already paired devices.
Switch on the actuator/controller that is to be coupled to power.
Switch on the actuator/controller that is to be coupled to power.
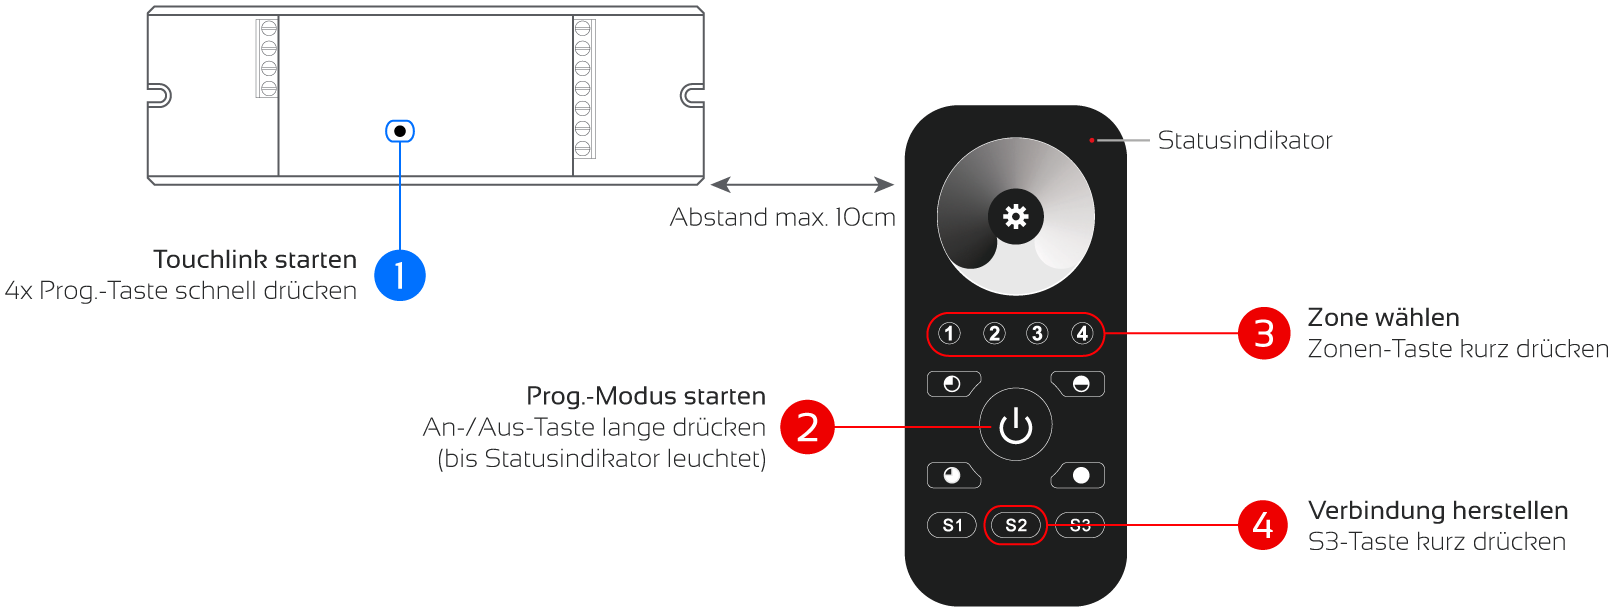
Coupling wall dimmer (5140)
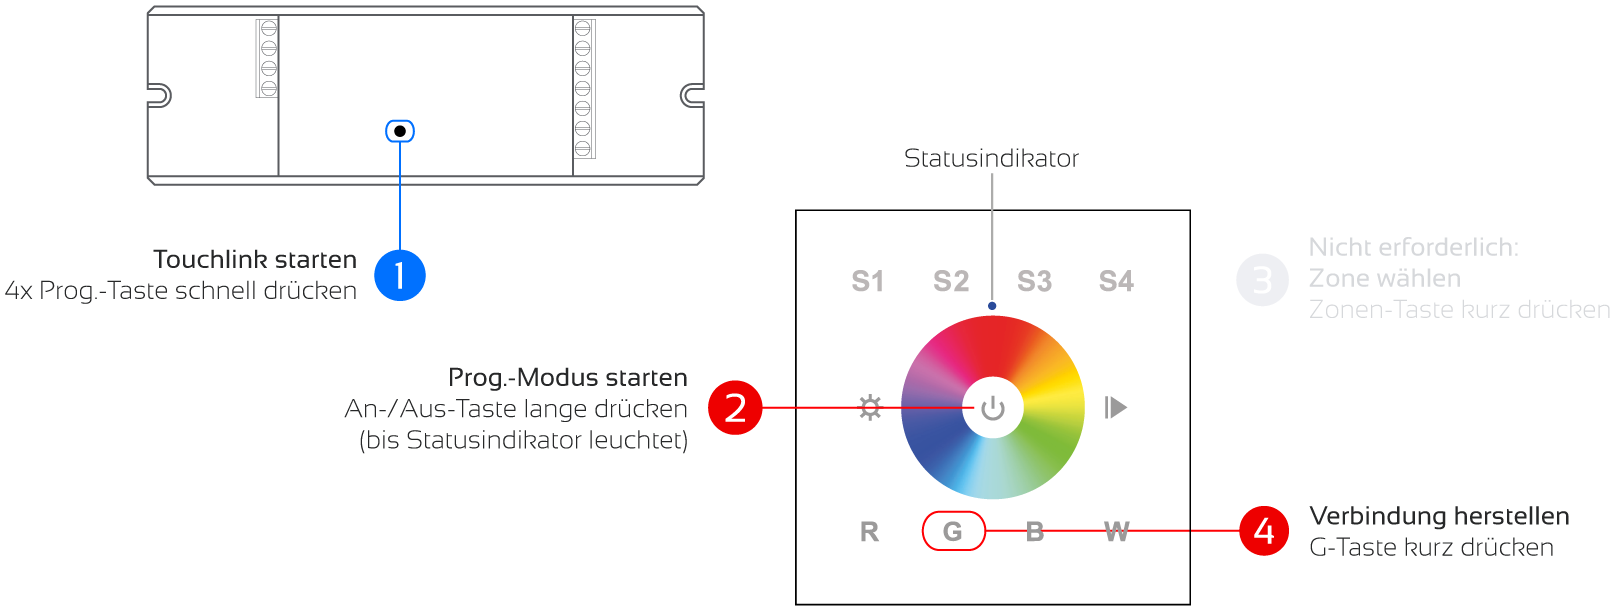
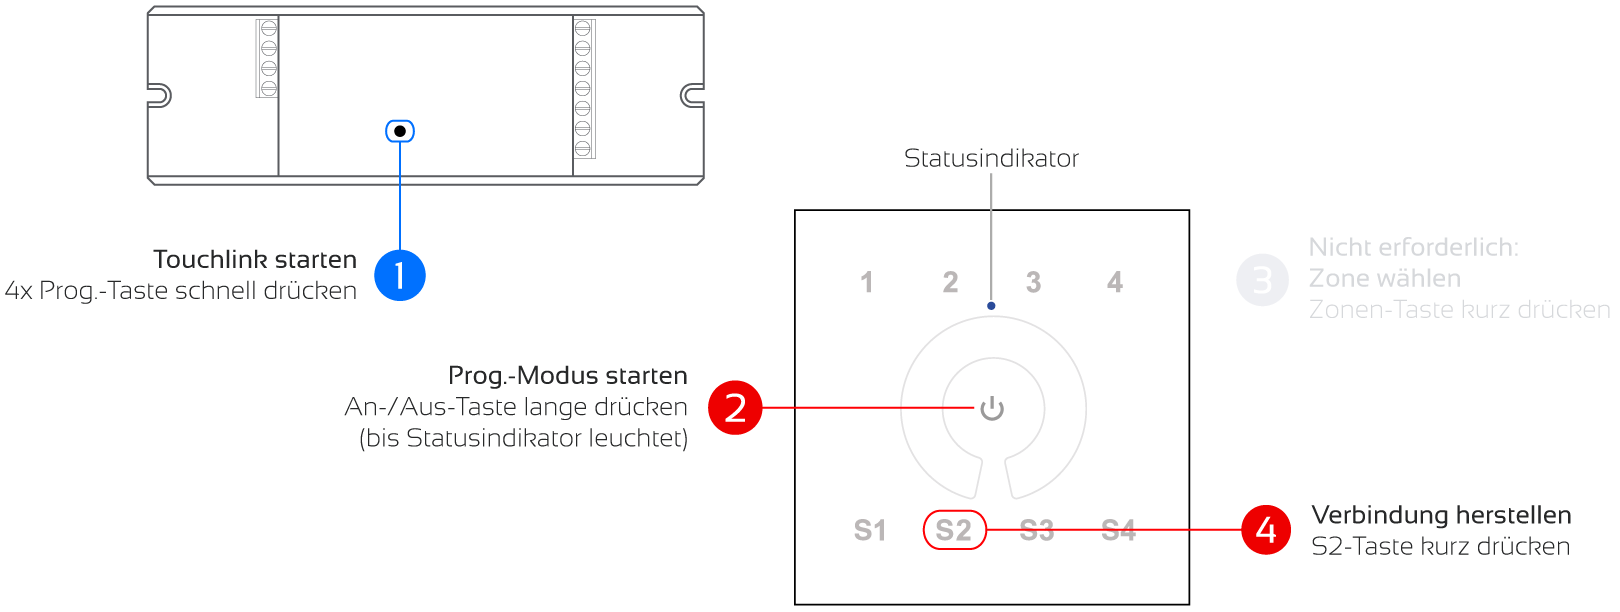
Coupling wall dimmer coloured 1 zone (5146)

Coupling wall dimmer coloured 4 zones (5146)
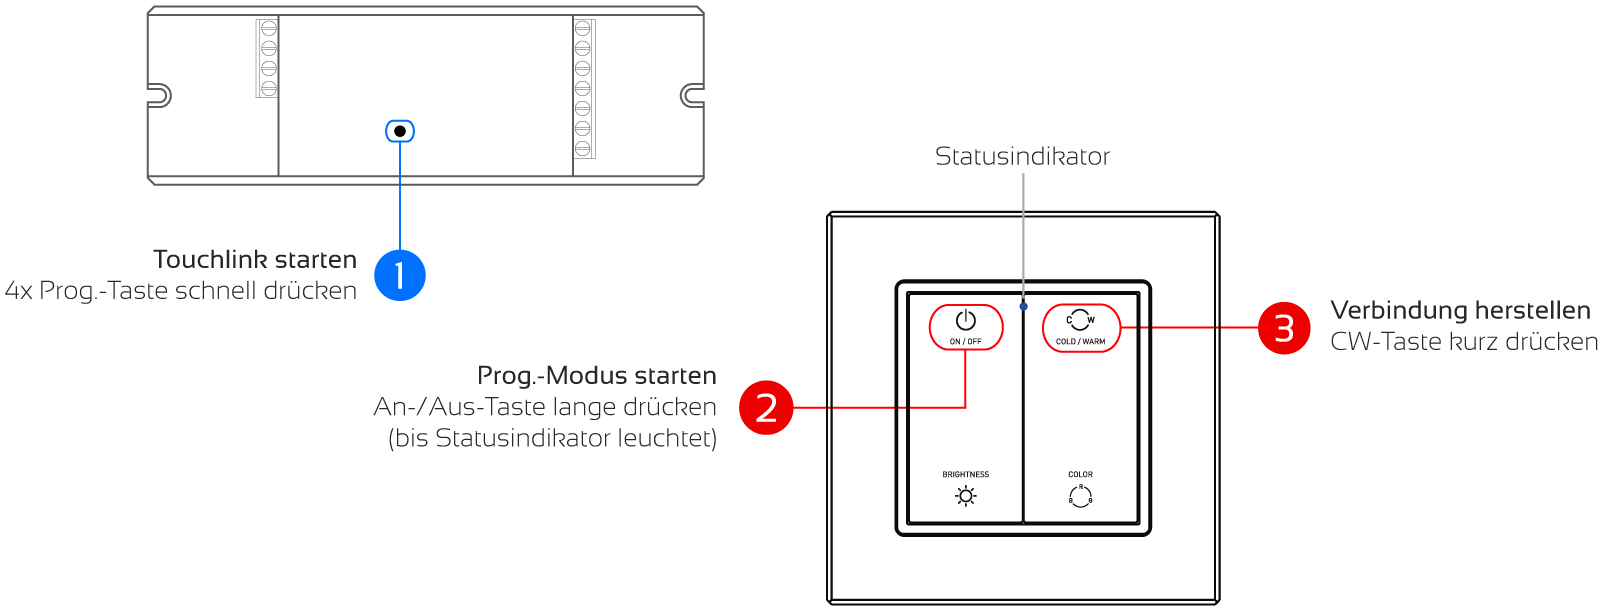
Coupling wall dimmer white (5146)
Start Touchlink
Press the "Prog" button on the actuator/controller 4 times quickly.
Start programming mode
Press and hold the central on/off button on the remote control until the LED on the control unit lights up.
Select zone
Select the desired zone and briefly press the desired zone button.
Establish connection
Immediately afterwards, briefly press the S2 (hand-held remote control) or G (wall-mounted remote control) button
Receive confirmation
Wait until the status LED on the control unit flickers rapidly and the light source flashes.
Search mode is indicated on the remote control by the LED flashing slowly.
Successful pairing is acknowledged with a flickering of the light source.
The Zigbee (Hue) Bridge - if present - will not visibly acknowledge successful integration.
The actuator/controller to be coupled should not be more than 10 cm away from the remote control.

Switch on the actuator/controller that is to be coupled to power.
Coupling wall dimmer (5140)

Coupling wall dimmer coloured 1 zone (5146)
Coupling wall dimmer coloured 4 zones (5146)

Coupling wall dimmer white (5146)
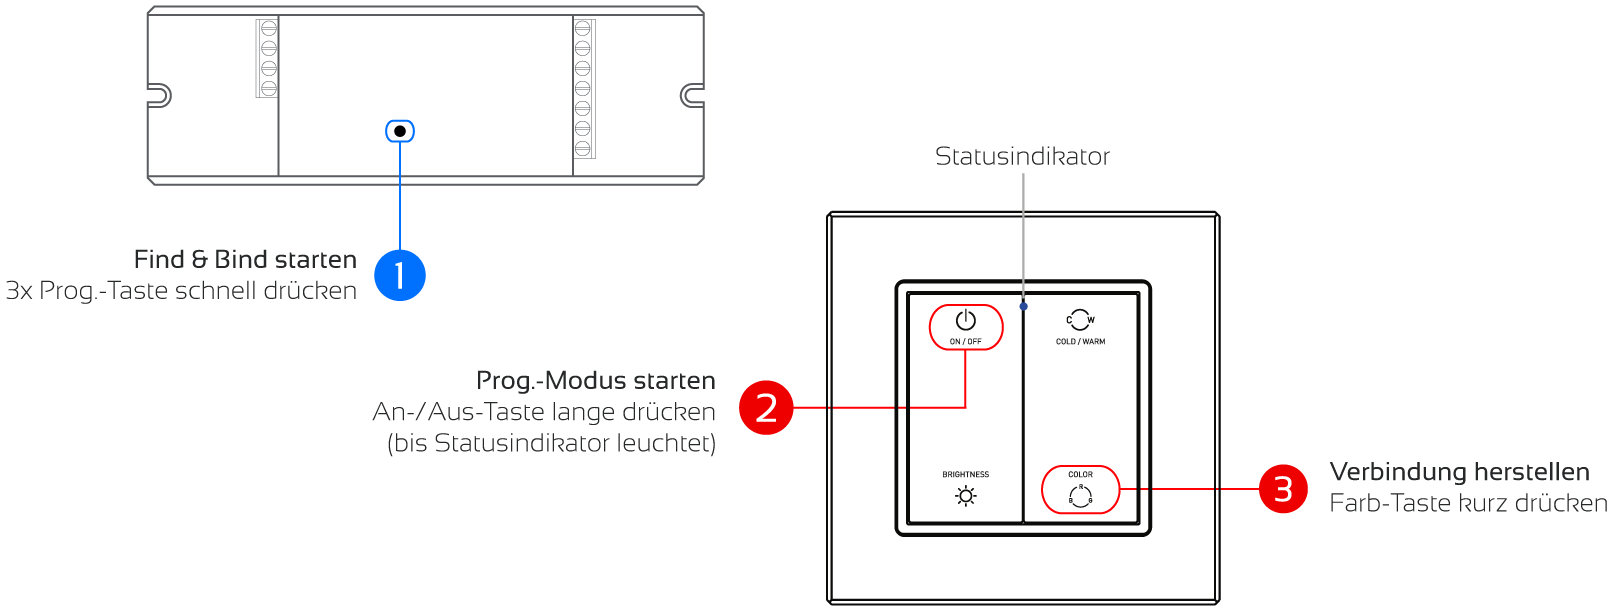
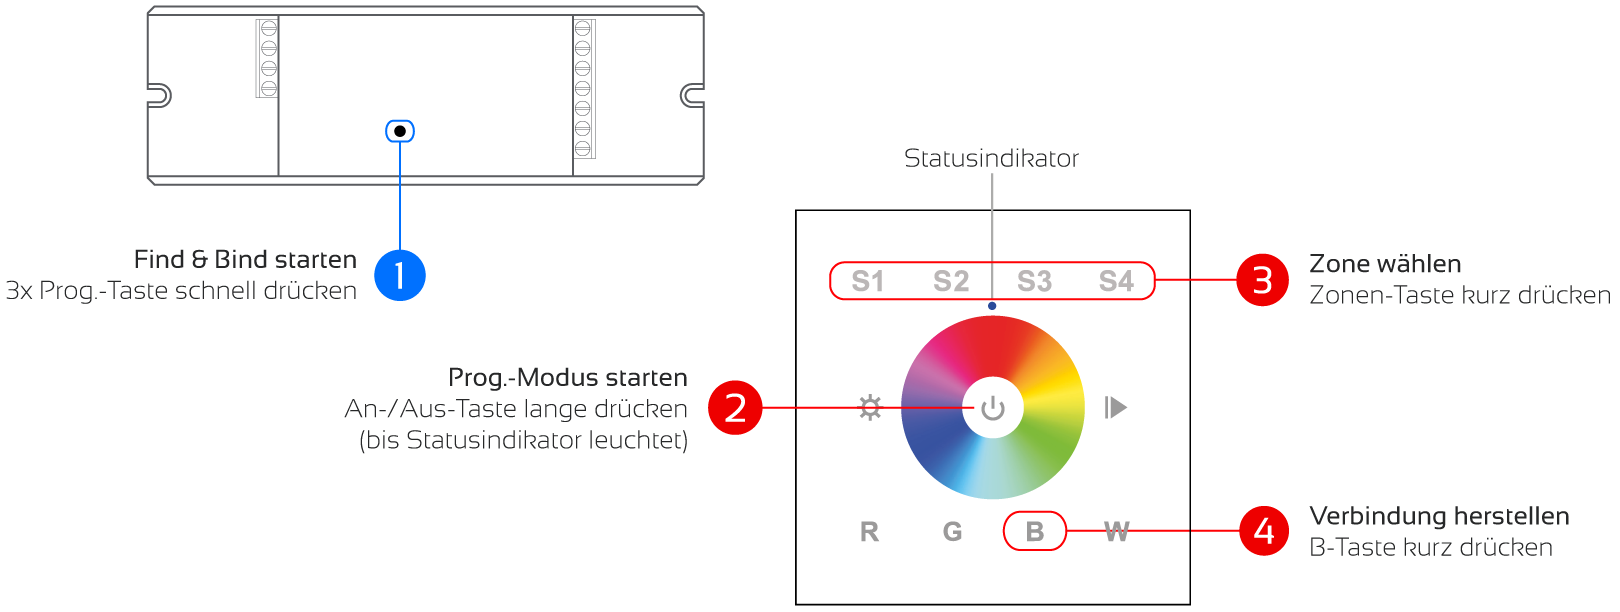
Start Find & Bind
Quickly press the "Prog" button on the actuator/controller three times.
Start programming mode
Press and hold the central on/off button on the remote control until the LED on the control unit lights up.
Select zone
Briefly press the desired zone button (1-4).
Establish connection
Immediately afterwards, briefly press the S3 (hand-held remote control) or B (wall-mounted remote control) button.
Wait until the status LED on the control unit flickers rapidly and the light source flashes.
Search mode is indicated on the remote control by the LED flashing slowly.
Successful pairing is acknowledged with a flickering of the light source.
The Zigbee (Hue) Bridge - if present - will not visibly acknowledge successful integration.
The Find & Bind search mode runs for 3 minutes. If the process is unsuccessful, wait more than 3 minutes and try again.
How do I correct errors?
The fault analysis can be carried out using the instruction manual supplied with the product.
If you cannot find the instruction manual, please check the product page in our shop - under Downloads you will find the corresponding instruction manual.
Alternatively, you can contact our customer service.